So you’ve just bought a bunch of vibrant, fresh radishes and are wondering how to bring out their fullest potential in your recipes. Look no further! In this beginner’s guide to trimming radishes, we will walk you through the simple steps to ensure you achieve perfectly trimmed radishes every time. Whether you want to showcase their natural beauty or create bite-sized garnishes, this article has got you covered. So grab those radishes and get ready to elevate your meals with a touch of radish elegance.

A Beginner’s Guide to Trimming Radishes
If you’ve ever found yourself staring at a bunch of radishes and wondering where to start, you’re not alone. Trimming radishes can seem like a daunting task for beginners, but with a few simple techniques and the right tools, you’ll be able to clean, prepare, and trim these versatile vegetables in no time. In this guide, we’ll walk you through the different types of radishes, the tools and ingredients you’ll need, as well as step-by-step instructions on how to select, wash, trim, and cut radishes into various shapes.
Types of Radishes
Radishes come in a variety of types, each with its own unique flavor, shape, and color. Here are some common varieties of radishes you may come across:
Common Varieties
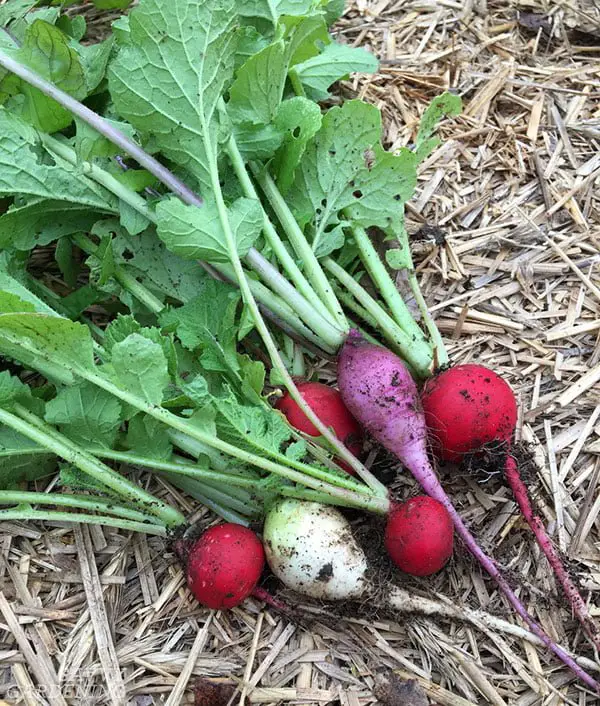
Red Radishes: These are the most common and widely available radishes. They have a round shape, vibrant red skin, and a crisp, peppery flavor.
White Radishes: Also known as daikon radishes, these are larger than red radishes and have a mild, slightly sweet flavor. They are often used in Asian cuisine.
French Breakfast Radishes: These radishes are elongated with a white tip and a vibrant red body. They have a milder flavor compared to red radishes.
Watermelon Radishes: These radishes have a green and white exterior, but when sliced, reveal a beautiful pink interior reminiscent of a watermelon. They have a mild, sweet flavor.
Popular Shapes and Colors
Radishes also come in various shapes and colors, adding visual interest to your dishes. Some popular shapes include round, oval, or elongated. Colors range from red, white, pink, purple, and even black. Experimenting with different radish varieties can add a stunning pop of color to your meals.

Tools and Ingredients
Before you start trimming radishes, it’s essential to gather the necessary tools and ingredients. Here’s what you’ll need:
Sharp Knife: A sharp knife will make your task easier and ensure clean cuts without crushing the radishes.
Cutting Board: A stable cutting board provides a safe and secure surface for slicing and dicing radishes.
Bowl of Cold Water: This will be used to soak the radishes after washing and keep them fresh.
Paper Towels: You’ll need these to dry the radishes after washing and to absorb any excess moisture.
Having these tools and ingredients ready will make the process smoother and more efficient.
Selecting Fresh Radishes
The key to enjoying flavorful radishes starts with selecting fresh ones. When choosing radishes, consider the following factors:
Appearance
Look for radishes that have a bright, vibrant color and smooth, blemish-free skin. Avoid radishes that have cuts, soft spots, or signs of mold.
Texture
Fresh radishes should feel firm and dense when gently squeezed. Avoid radishes that feel mushy or spongy, as this indicates they may be past their prime.
Smell
Give the radishes a gentle sniff. They should have a clean, earthy aroma. If they smell off or have a pungent, unpleasant odor, it’s best to choose a different bunch.
Radish Tops
Inspect the greens attached to the radishes. They should be crisp and bright green. Avoid radishes with wilted, yellowed, or slimy greens, as this could indicate older, less fresh radishes.
By paying attention to these factors, you’ll ensure that you’re working with the freshest radishes for the best flavor and texture.

Washing and Preparing Radishes
Once you’ve selected your radishes, the next step is to wash and prepare them. Here’s a step-by-step guide:
Using Cold Water
Start by rinsing the radishes under cold water. This will remove any dirt or debris on the surface.
Gently Scrubbing
Using a vegetable brush or your fingers, gently scrub the radishes to remove any stubborn dirt. Pay extra attention to the areas around the root end and any crevices.
Drying with Paper Towels
After washing, pat the radishes dry with paper towels. This will remove excess moisture and prevent them from becoming waterlogged.
Storing After Washing
If you’re not using the radishes immediately, store them in a plastic bag or airtight container with a damp paper towel. This will help retain their moisture and keep them fresh.
Trimming the Greens
The greens attached to radishes, often referred to as radish tops, are edible and offer a unique flavor. Here’s how to trim them properly:
Retaining the Greens
If you’d like to use the radish tops in your cooking or salads, trim the greens, leaving about an inch of the stem attached to the radish. This will allow you to enjoy the fresh, peppery taste of the greens.
Benefits of Using the Greens
Radish tops are rich in nutrients and can be a great addition to your meals. They can be sautéed, added to salads or stir-fries, or even used to make pesto.
Removing Yellowed Leaves
If the radish tops have yellowed leaves, it’s best to remove them. Simply use a sharp knife or kitchen shears to trim away any discolored or damaged leaves. This will ensure that only fresh, vibrant greens are used.

Removing the Radish Tops
If you prefer to trim off the radish tops entirely, here’s how to do it:
Cutting Off the Greens
Using a sharp knife, carefully slice off the greens where they meet the radish. Make a clean, diagonal cut to remove the tops.
Trimming Spiky Tips
After removing the greens, take a look at the radish’s tip. If there are any spikey ends or rough patches, trim them off using a knife to create a neat, even appearance.
Peeling Radishes
While not all radishes require peeling, some varieties benefit from it. Here’s what you need to know about peeling radishes:
When to Peel
Radishes with a thick, tough skin, such as daikon or watermelon radishes, may benefit from peeling. Red radishes and smaller varieties often have a thin, edible skin and may not require peeling.
Using a Vegetable Peeler
To peel radishes, hold them firmly and glide a vegetable peeler along the skin, applying gentle pressure. Rotate the radish as you go until all the skin is removed.
Peeling Methods
Alternatively, you can also use a paring knife to carefully remove the skin by cutting away thin strips. Find the method that works best for you and the specific type of radish you’re working with.

Trimming the Radish Tail
Another step in trimming radishes is removing the root end, also known as the radish tail. Here’s how to do it:
Removing the Root End
Hold the radish firmly and slice off the root end using a sharp knife. This will create a flat, even surface for further preparation.
Trimming Uneven Edges
While not always necessary, if the radish has any uneven or jagged edges, you can use a knife to carefully trim and shape them. This will enhance the appearance of your sliced or diced radishes.
Cutting Radishes into Slices
Sliced radishes are a common way to enjoy them. Here’s how to cut radishes into slices:
Technique for Slice Cuts
Start by slicing off both ends of the radish. Then, using a sharp knife, slice the radish into thin, even rounds. Adjust the thickness to your preference, keeping in mind that thinner slices will provide a crisper texture.
Dicing Radishes
If you prefer smaller pieces of radish for salads or garnishes, dicing is the way to go:
Technique for Dicing
Begin by trimming and peeling the radish, if desired. Then, cut the radish into thin, even rounds following the previously mentioned slicing technique. Next, stack a few rounds together and slice them into matchsticks. Finally, turn the matchsticks on their side and cut crosswise to create small, uniform cubes.
Julienning Radishes
If you want to add an elegant touch to your dishes, julienning radishes is a technique worth mastering:
Technique for Julienne Cuts
Start by trimming and peeling the radish, if necessary. Then, cut the radish into thin, evenly sized matchsticks using a sharp knife or a mandoline slicer.
Using a Mandoline Slicer
A mandoline slicer can make the julienning process faster and more precise. Set the mandoline to the desired thickness, run the radish over the blade, and you’ll have beautifully uniform julienne cuts.
Julienne Sizes for Salads and Garnishes
Julienne cuts can vary in thickness and length. Depending on your preference and the dish you’re preparing, aim for matchstick-sized pieces that are around 2-3 inches in length.
With these techniques, you’ll have a variety of options for using radishes in your cooking. Whether you’re slicing, dicing, or julienning, you’ll be able to create visually appealing and delicious dishes.
Trimming radishes may seem intimidating at first, but with practice and these simple steps, you’ll gain confidence and become proficient in preparing radishes for your culinary endeavors. So next time you come across a bunch of fresh radishes, don’t hesitate to put your newfound knowledge into action and enjoy their bright, crisp flavors. Happy trimming!


