In this article, you will learn the professional techniques and step-by-step process of efficiently peeling apples. Whether you are a beginner in the kitchen or a seasoned chef, mastering the art of paring apples is essential for a variety of culinary creations. By following the expert tips provided, you will gain the skills required to effortlessly remove the skin while preserving the maximum amount of fruit, resulting in perfectly peeled apples for your recipes. So, let’s embark on this journey and unravel the secrets to achieving flawless apple paring.

Choosing the Right Apples
When it comes to choosing apples, there are a few factors to consider. First and foremost, you want to look for firm and ripe apples. The texture of the apple is important, as you don’t want overly soft or mushy apples. Additionally, you’ll want to consider the sweetness and tartness of the apple. Some people prefer sweeter apples, while others enjoy a more tart flavor. It’s a matter of personal preference, so choose the variety that suits your taste buds.
Another consideration when choosing apples is whether to opt for organic or conventional ones. Organic apples are grown without the use of synthetic pesticides and are often seen as a healthier option. However, they can be more expensive and may not be readily available in all areas. Conventional apples, on the other hand, are widely accessible and may be more affordable. Ultimately, the choice between organic and conventional will depend on your personal values and budget.
Lastly, it’s important to choose the right apple variety for your recipe. Some apples are better suited for baking, while others are perfect for snacking or making applesauce. Popular baking apples include Granny Smith, Honeycrisp, and Braeburn, as they have a firm texture and hold up well during the cooking process. If you’re unsure which apple variety to use, consult your recipe or reach out to a knowledgeable source for guidance.
Preparation and Tools
Before you begin paring your apples, it’s essential to gather the necessary tools. These tools may include a sharp knife, a peeler, an apple corer, and an apple slicer. Having these items on hand will make the paring process easier and more efficient.
Next, you’ll want to wash the apples thoroughly. This step is crucial as it helps remove any dirt, debris, or wax coating that may be present on the apple’s skin. Rinse the apples under cold water and use a gentle scrub brush to ensure a thorough cleaning. For extra peace of mind, you can also use a small amount of mild dish soap while washing the apples. Be sure to rinse them well to remove any soap residue.
Depending on your preference and the recipe you’re preparing, you can either peel or scrub the apples. Peeling the apples will remove the entire skin, resulting in a smoother texture. On the other hand, scrubbing the apples will clean the skin while leaving it intact. The choice between peeling and scrubbing will depend on personal preference and the specific requirements of your recipe.

Using a Knife
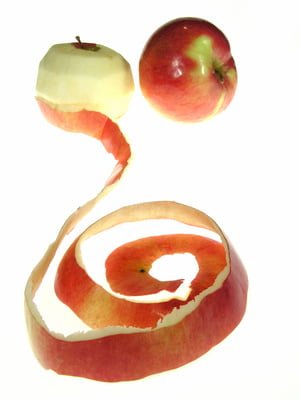
If you’ve chosen to peel your apples with a knife, there are a few steps to follow to ensure safe and efficient paring. First, hold the apple securely in your non-dominant hand. This will provide stability and minimize the risk of injury. Begin paring at the top of the apple and work your way down towards the bottom.
When using a knife to peel an apple, it’s important to remove the skin in strips. Starting at the top, gently slide the knife just beneath the skin and slowly peel it away from the flesh of the apple. Continue this process, rotating the apple as needed, until all the skin has been removed. Be cautious while peeling and maintain a steady hand to avoid accidentally cutting yourself.
After peeling the apple, you may notice that there are small pieces of remaining peel. To remove these, simply slice off any remaining peel using your knife. This will ensure that the apple is completely skin-free and ready to use in your recipe.
Using a Peeler
Using a peeler to pare your apples is another popular method, as it can be quicker and requires less knife skills. To begin, hold the apple firmly in your non-dominant hand. This will help keep the apple steady while you’re peeling it. Place the peeler at the top of the apple, just beneath the stem, and apply downward pressure.
As you peel, rotate the apple in your hand to ensure that you’re removing the skin evenly. Continue peeling until all the skin has been removed and only the smooth flesh of the apple remains. Using a peeler can be a straightforward and efficient way to pare your apples, especially if you’re working with a large quantity.

Using an Apple Corer
An apple corer is a handy tool when it comes to removing the core from an apple. To use an apple corer, position it at the top of the apple, just beneath the stem. Apply downward pressure and twist the corer to create a hole in the center of the apple. The core should easily come out with the corer, leaving you with a perfectly cored apple.
Removing the core is particularly useful when you’re planning to slice or chop the apple for recipes like salads or fruit platters. It eliminates the tough core and seeds, leaving only the tender and edible parts of the apple. An apple corer is a great investment if you frequently use apples in your cooking or baking endeavors.
Using an Apple Slicer
If you’re looking for a quick and efficient way to slice your pared apples, an apple slicer can be a helpful tool. To use an apple slicer, position it over the apple and align the central hole with the core. Apply firm downward pressure to push the slicer through the apple and create evenly sized slices.
Once the slicer has cut through the apple, remove the sliced apple sections. This process is much faster and more consistent compared to slicing by hand. An apple slicer is especially useful when you need multiple slices for recipes such as apple pies, tarts, or fruit salads. It saves time and effort, allowing you to enjoy your recipes sooner.

Avoiding Browning
When you pare apples, they may oxidize and turn brown due to exposure to air. However, there are a few simple steps you can take to prevent browning and keep your pared apples looking fresh and appetizing.
One method is to treat the apple slices with lemon juice. The citric acid in lemon juice acts as a natural antioxidant and helps slow down the oxidation process. Simply drizzle a small amount of lemon juice over the apple slices and toss gently to ensure even coverage. This method not only prevents browning but also adds a subtle tangy flavor to the apples.
Another way to prevent browning is to soak the apple slices in a saltwater solution. Dissolve a teaspoon of salt in a cup of cold water and submerge the apple slices for about five minutes. The saltwater solution prevents enzymatic browning, keeping the apples looking fresh and vibrant. After soaking, rinse the apple slices with cold water to remove any residual salt.
It’s also crucial to store the pared apple slices properly to prevent browning. Keep them in an airtight container or a resealable plastic bag to minimize exposure to air. This will help maintain the freshness and appearance of the apple slices. If possible, refrigerate the container to further extend the shelf life of the prepared apples.
Using Pared Apples in Recipes
Now that you have your perfectly pared apples, you can incorporate them into your favorite recipes. Depending on your needs and the specific recipe, there are a few steps to follow when using pared apples.
First, slice the pared apples into the desired shapes or sizes. This may involve cutting them into wedges, thin slices, or chunks, depending on the recipe’s instructions or your personal preference. Take care to ensure that the slices are uniform in size, as this will ensure even cooking and presentation in your dishes.
Next, add the pared apples to your recipe as directed. This may involve combining them with other ingredients, such as sugar, cinnamon, or butter, depending on the flavor profile you’re aiming to achieve. Pared apples can be used in a wide range of recipes, from classic apple pies and crisps to savory dishes like roasted pork with apples. Feel free to get creative and experiment with different flavor combinations to suit your taste and culinary preferences.
When using pared apples in recipes, it’s essential to adjust the cooking times accordingly. Pared apples may cook faster than whole apples due to their smaller size and exposed flesh. Keep an eye on your dish while it’s cooking, and follow the recipe’s instructions for timing adjustments if necessary. Overcooking can result in mushy apples, while undercooking may leave them too firm and unappetizing.

Storing Pared Apples
If you have an excess of pared apples and want to preserve them for later use, proper storage is crucial. Follow these steps to ensure your pared apples stay fresh and maintain their quality.
Place the pared apples in an airtight container, such as a glass container with a tightly sealed lid or a resealable plastic bag. It’s important to keep them well-protected to prevent air exposure and reduce the risk of browning. Make sure the container is clean and dry before adding the pared apples to avoid any potential contamination.
For short-term storage, such as a few days to a week, refrigerating the container is your best option. The cold temperature of the refrigerator helps slow down the enzymatic browning process and maintains the freshness of the apples. Pared apples stored in the refrigerator can still be used in a variety of recipes, from fruit salads to baked goods.
If you want to store pared apples for a longer duration, such as several months, freezing is the ideal method. Before freezing, consider how you plan to use the apples. If you’ll be using them for baking, it’s helpful to measure and portion them into recipe-specific quantities. This makes it easier to grab the exact amount you need without thawing more than necessary.
To freeze the pared apples, place them in a freezer-safe bag or container, ensuring there is minimal exposure to air. Press out any excess air before sealing the bag or container tightly. Properly sealed and frozen, the pared apples can maintain their quality for up to six months. When you’re ready to use them, simply thaw the desired amount in the refrigerator overnight or use them directly in your recipe if they will be cooked.
Creative Uses for Pared Apple Peels and Cores
When paring apples, you’re left with the peels and cores, which often go unused. However, there are several creative ways to make the most of these leftover apple parts.
One option is to turn the apple peels into apple peel crisps. After thoroughly washing the apple peels, toss them in a mixture of sugar and cinnamon. Spread the coated peels on a baking sheet and bake in a preheated oven until they become crispy. The resulting apple peel crisps are a delicious and nutritious snack, packed with fiber and natural sweetness.
Another idea is to use the apple peels and cores to flavor water or tea. Simply place the peels and cores in a jug of water and let them infuse for a few hours. The natural apple flavors will infuse the water, creating a refreshing drink with a hint of apple goodness. You can also add these infused peels and cores to your favorite tea blend for a unique and aromatic twist.
For those interested in homemade pantry staples, the apple peels and cores can be used to create homemade apple cider vinegar. Combine the peels and cores with water and a sweetener, such as sugar or honey, in a clean glass jar. Cover the jar with a breathable cloth, secure it with a rubber band, and allow it to sit at room temperature for several weeks. Over time, the mixture will ferment and transform into apple cider vinegar, which can be used for dressings, marinades, or even as a natural cleaning solution.
In conclusion, paring apples can be a straightforward and rewarding process, especially when armed with the right techniques and tools. From choosing the perfect apples to storing your pared apples for later use, each step plays a significant role in the final outcome of your recipes. Remember to consider your personal preferences, recipe requirements, and storage needs throughout the paring process to ensure delicious and enjoyable results. Happy paring!