So you’ve planted some radishes in your garden, and now you’re staring at a sea of sprouts wondering how in the world they’re all going to fit. Don’t panic! Thinning out radishes is a simple process that will ensure your harvest is healthy and thriving. In just five easy steps, you’ll learn how to give your radishes the space they need to grow into delicious, plump roots. Say goodbye to overcrowded beds and hello to a bountiful radish harvest!

Why Thin Out Radishes
If you’re a gardening enthusiast, you know that growing radishes can be incredibly rewarding. These crisp and tangy root vegetables are quick to grow and are a delightful addition to salads and other dishes. However, when it comes to radishes, overcrowding can be a real issue. That’s where thinning out radishes becomes essential. In this article, we will explore the benefits and importance of thinning out radishes, when to do it, the tools you will need, step-by-step instructions, proper aftercare, common mistakes to avoid, and answer some frequently asked questions.
Benefits of Thinning Out Radishes
Thinning out radishes might seem like an unnecessary step, but it offers several benefits. First and foremost, thinning helps in preventing overcrowding. Radishes require space to develop healthy roots. When they are overcrowded, the roots cannot grow properly, resulting in stunted and misshapen radishes. Additionally, thinning out radishes allows the remaining plants to receive adequate sunlight, water, and nutrients. This ensures healthier plants and a more abundant harvest. Thinning also helps in reducing the risk of diseases since better air circulation prevents the spread of fungal and bacterial infections.

When to Thin Out Radishes
Knowing the right time to thin out radishes is crucial for their overall growth and development. Typically, you should thin out radishes when they have reached a height of about 1-2 inches and have developed their first true leaves. Thinning too early can result in damaging the remaining seedlings, while delaying thinning can lead to overcrowding and hinder the radishes’ growth. It’s important to keep a close eye on your radishes and regularly assess their growth to determine the ideal time for thinning.
Tools You Will Need
Before diving into the actual process of thinning out radishes, it’s important to gather the necessary tools. Fortunately, you don’t need a vast array of gardening equipment to get the job done. Here are a few essential tools you will need:
Garden Hoe
A garden hoe will come in handy when clearing the soil of weeds and creating space for thinning. Opt for a hoe with a sharp blade and a comfortable handle for ease of use.
Garden Fork
A garden fork is used to gently lift and separate the radishes from the soil during thinning. Look for a sturdy fork with sharp tines that can penetrate the ground without damaging the delicate roots.
Gardening Gloves
Protecting your hands while working in the garden is vital. Choose a pair of gardening gloves that fit well and provide adequate protection against cuts, scratches, and dirt.

Step 1: Understand Thinning Out Radishes
What is Thinning Out Radishes?
Thinning out radishes refers to the process of removing excess seedlings to create appropriate spacing between the remaining plants. This ensures better root development, prevents overcrowding, and promotes healthy growth.
Why is Thinning Out Radishes Important?
Thinning out radishes is crucial for their overall health and yield. Overcrowding can lead to competition for resources such as sunlight, water, and nutrients, resulting in stunted growth and misshapen radishes. Proper spacing allows each radish plant to receive the necessary resources, leading to healthier and more productive plants. Additionally, thinning helps prevent the spread of diseases by improving air circulation between the plants.
Step 2: Determine the Ideal Spacing
Before thinning out radishes, it’s essential to determine the ideal spacing for your specific radish variety. Different varieties have different spacing requirements, so it’s important to take this into consideration for optimal growth.
Factors to Consider for Spacing
When deciding on the spacing between radishes, there are a few factors to consider. First, consider the size of the mature radish. Larger varieties will require more space between plants compared to smaller ones. Additionally, consider the type of soil you have. If you have heavy clay soil, plants may need more space for proper root growth compared to if you have loose, loamy soil. Finally, consider the environmental conditions of your garden. Radishes planted in hotter climates may benefit from slightly wider spacing to avoid heat stress.
Recommended Spacing for Radish Varieties
As a general guideline, radishes should be spaced approximately 1-2 inches apart for smaller varieties and 2-3 inches apart for larger varieties. However, always refer to the specific recommendations provided with your radish seeds or plants for the most accurate spacing guidelines.

Step 3: Prepare the Soil
Before getting started with the actual thinning process, it’s crucial to prepare the soil properly. This ensures that the remaining radish plants have the best growing conditions.
Clearing Weeds and Debris
Begin by clearing any nearby weeds and removing debris from the area around your radish plants. Weeds compete with the radishes for resources and can hinder their growth. Removing them will create a cleaner and healthier environment for your radishes.
Loosening the Soil
Using a garden fork, gently loosen the soil around the radish plants. This helps to relieve any compaction and makes it easier to lift the excess seedlings during thinning. Be careful not to damage the roots of the remaining radish plants or disturb the surrounding soil too much.
Adding Organic Matter
Consider adding organic matter, such as compost or well-rotted manure, to your garden bed before thinning out radishes. This enriches the soil and provides essential nutrients for optimal plant growth. Mix the organic matter into the soil to ensure it is distributed evenly.
Step 4: Thinning Out the Radishes
Now that you’ve prepared the soil, it’s time to thin out the radishes. By following the proper techniques, you can ensure that the remaining plants have enough space to thrive.
Selecting Radishes for Thinning
Begin by carefully assessing your radish plants and selecting which ones to thin out. Look for the weaker, smaller, or more crowded seedlings. These are the ones that will benefit the most from being removed.
Techniques for Thinning Out Radishes
There are a few techniques you can use to thin out radishes. One method is to gently lift the excess seedlings using a garden fork. Insert the fork into the soil next to the seedling you want to remove, being careful not to damage the roots of the surrounding plants. Gently lift the seedling out of the ground, loosening the soil around it if necessary. Another technique involves simply pinching off the excess seedlings at the soil line using your fingers. This method is best for smaller seedlings that haven’t developed extensive root systems yet.
Properly Removing Excess Seedlings
When removing the excess seedlings, it’s important to take care not to disturb the roots of the remaining plants. Gently lift the seedlings or pinch them off at the soil level, ensuring that the surrounding soil remains undisturbed. Be mindful of your movements to avoid accidentally damaging nearby radish plants.

Step 5: Proper Aftercare
After thinning out radishes, it’s essential to provide proper aftercare to ensure the remaining plants continue to thrive and produce a bountiful harvest.
Watering
Water your radishes immediately after thinning to help them recover from the transplant shock. Ensure that the soil is evenly moist, but not overly saturated. Radishes prefer consistent moisture, so monitor their watering needs and water whenever the top inch of soil feels dry.
Fertilizing
Consider applying a balanced fertilizer to your garden bed after thinning out radishes. This provides additional nutrients that will benefit the remaining plants. Choose a fertilizer specifically formulated for root vegetables or a general-purpose organic fertilizer. Follow the instructions on the packaging for proper application rates.
Mulching
Mulching can help conserve moisture, suppress weed growth, and regulate soil temperature. Apply a layer of organic mulch, such as straw or shredded leaves, around the remaining radish plants. Be careful not to cover the plants’ base to avoid potential rotting.
Common Mistakes to Avoid
To ensure successful thinning out of radishes, it’s important to avoid these common mistakes:
Waiting too Long to Thin Out
If you wait too long to thin out your radishes, overcrowding can occur, hindering the growth and development of the remaining plants. Make sure to regularly monitor your radishes and thin them out as soon as they reach the appropriate size and stage of growth.
Over-thinning the Radishes
While thinning out radishes is crucial, it’s equally important not to overdo it. Removing too many seedlings can leave too much space between the remaining plants, resulting in wasted space and potentially allowing weeds to take over. Follow the recommended spacing guidelines and only remove the excess seedlings necessary for proper growth.
Neglecting Aftercare
After thinning out radishes, it’s important to provide proper aftercare, including watering, fertilizing, and mulching. Neglecting these steps can hinder the growth and health of the remaining plants. Make sure to continue monitoring and caring for your radishes throughout their growing season.
Frequently Asked Questions
Can I Eat the Radish Thinnings?
Absolutely! Radish thinnings are perfectly edible and can be enjoyed in a variety of ways. Add them to salads, use them as a garnish, or lightly sauté them for a delicious and nutritious treat.
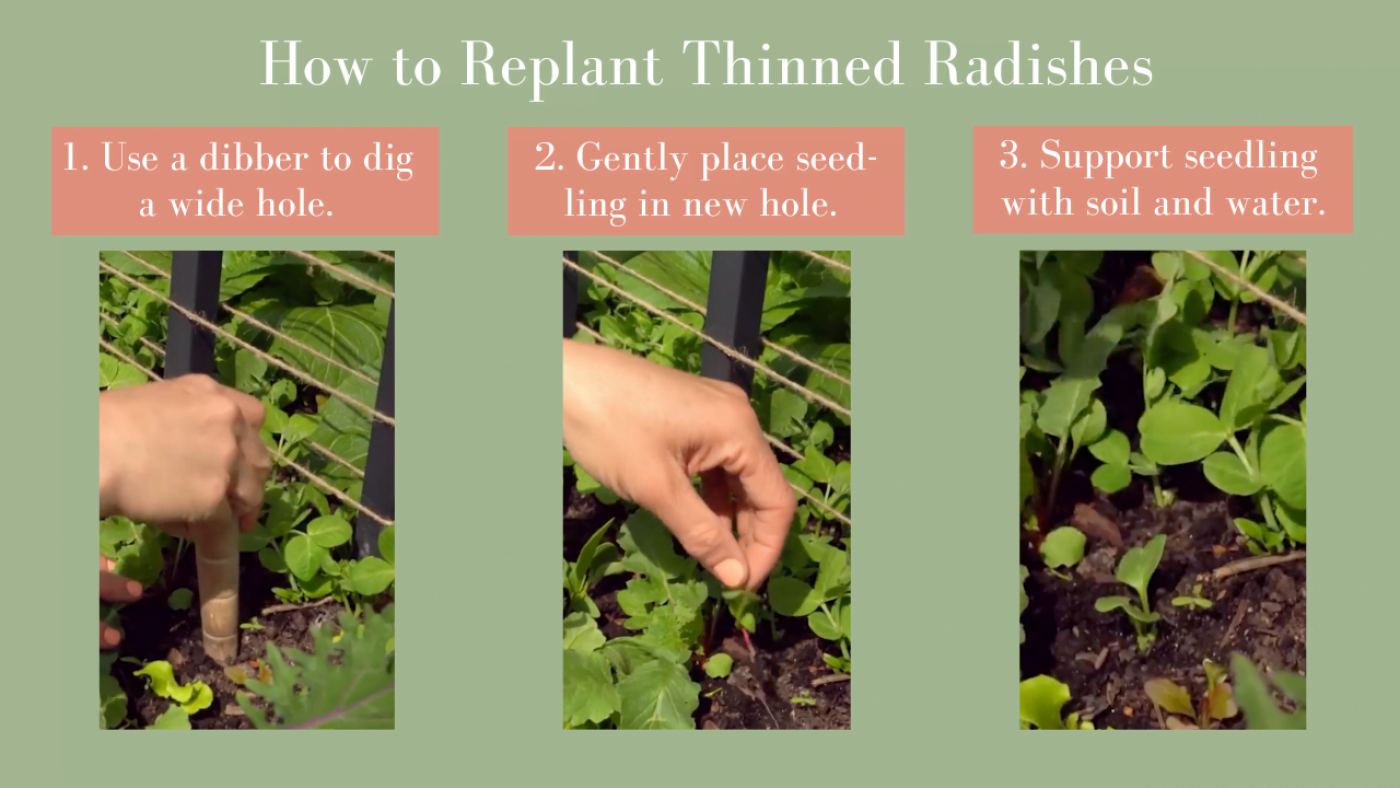
Can I Transplant the Thinned Seedlings?
Transplanting the thinned seedlings is not recommended. The process of thinning can be stressful for the plants, and transplanting them can further disrupt their growth. It’s best to compost the excess seedlings or discard them.
Can I Thin Out Radishes in Containers?
Yes, radishes can also be grown in containers, and thinning them out is just as important. Follow the same thinning techniques and guidelines mentioned earlier, ensuring that the remaining plants have enough space to grow and thrive.
Conclusion
Thinning out radishes is a crucial step in ensuring healthy and abundant harvests. By understanding the benefits and importance of thinning, determining the ideal spacing, preparing the soil, properly thinning out the radishes, and providing proper aftercare, you can enjoy a bountiful harvest of delicious and beautifully shaped radishes. Remember to avoid common mistakes and follow the recommended guidelines, and you’ll be rewarded with vibrant, healthy radish plants that will enhance your gardening experience. Happy growing!


