If you’ve ever wanted to grow your own butternut squash but didn’t have the space for a sprawling garden, fear not! This guide will show you a simple and efficient way to grow butternut squash vertically. By utilizing trellises or fences, you can maximize your small garden space and still enjoy the delicious taste of homegrown butternut squash. From choosing the right variety of squash to providing proper support, this article will walk you through the steps to successfully grow butternut squash vertically. So get ready to embrace your green thumb and embark on a journey to produce your very own bountiful harvest of this delectable autumn staple.

Choosing a Variety of Butternut Squash
When selecting a variety of butternut squash to grow vertically, there are several factors to consider. First, determine the space and structure requirements of the specific variety you are interested in. Some varieties may require more vertical space or sturdier support structures than others. Consider the available space in your garden and choose a variety that will fit within those limitations.
Next, take into account the climatic requirements of the butternut squash variety. Different varieties may have different temperature and sunlight needs. Make sure to choose a variety that is well-suited to the climate in your area to ensure the best chances of success.
Another important consideration is the preferred harvest time of the butternut squash. Some varieties may mature earlier or later in the season. Consider when you typically want to harvest your squash and choose a variety that aligns with your preferred timing.
Lastly, it is wise to choose disease-resistant varieties of butternut squash. Certain varieties have been bred to be more resistant to common diseases that can affect squash plants. By selecting disease-resistant varieties, you can minimize the risk of losing your crop to pests or diseases.
Preparing the Vertical Growing Space
Before you start growing butternut squash vertically, it is important to prepare the appropriate space for your plants to thrive. Here are some key steps to follow:
Selecting a Suitable Location
Choose a location in your garden that receives full sun for at least six to eight hours a day. Butternut squash plants thrive in sunny locations, so selecting a spot with ample sunlight is crucial. Additionally, ensure that the location provides good air circulation to prevent disease and promote healthy growth.
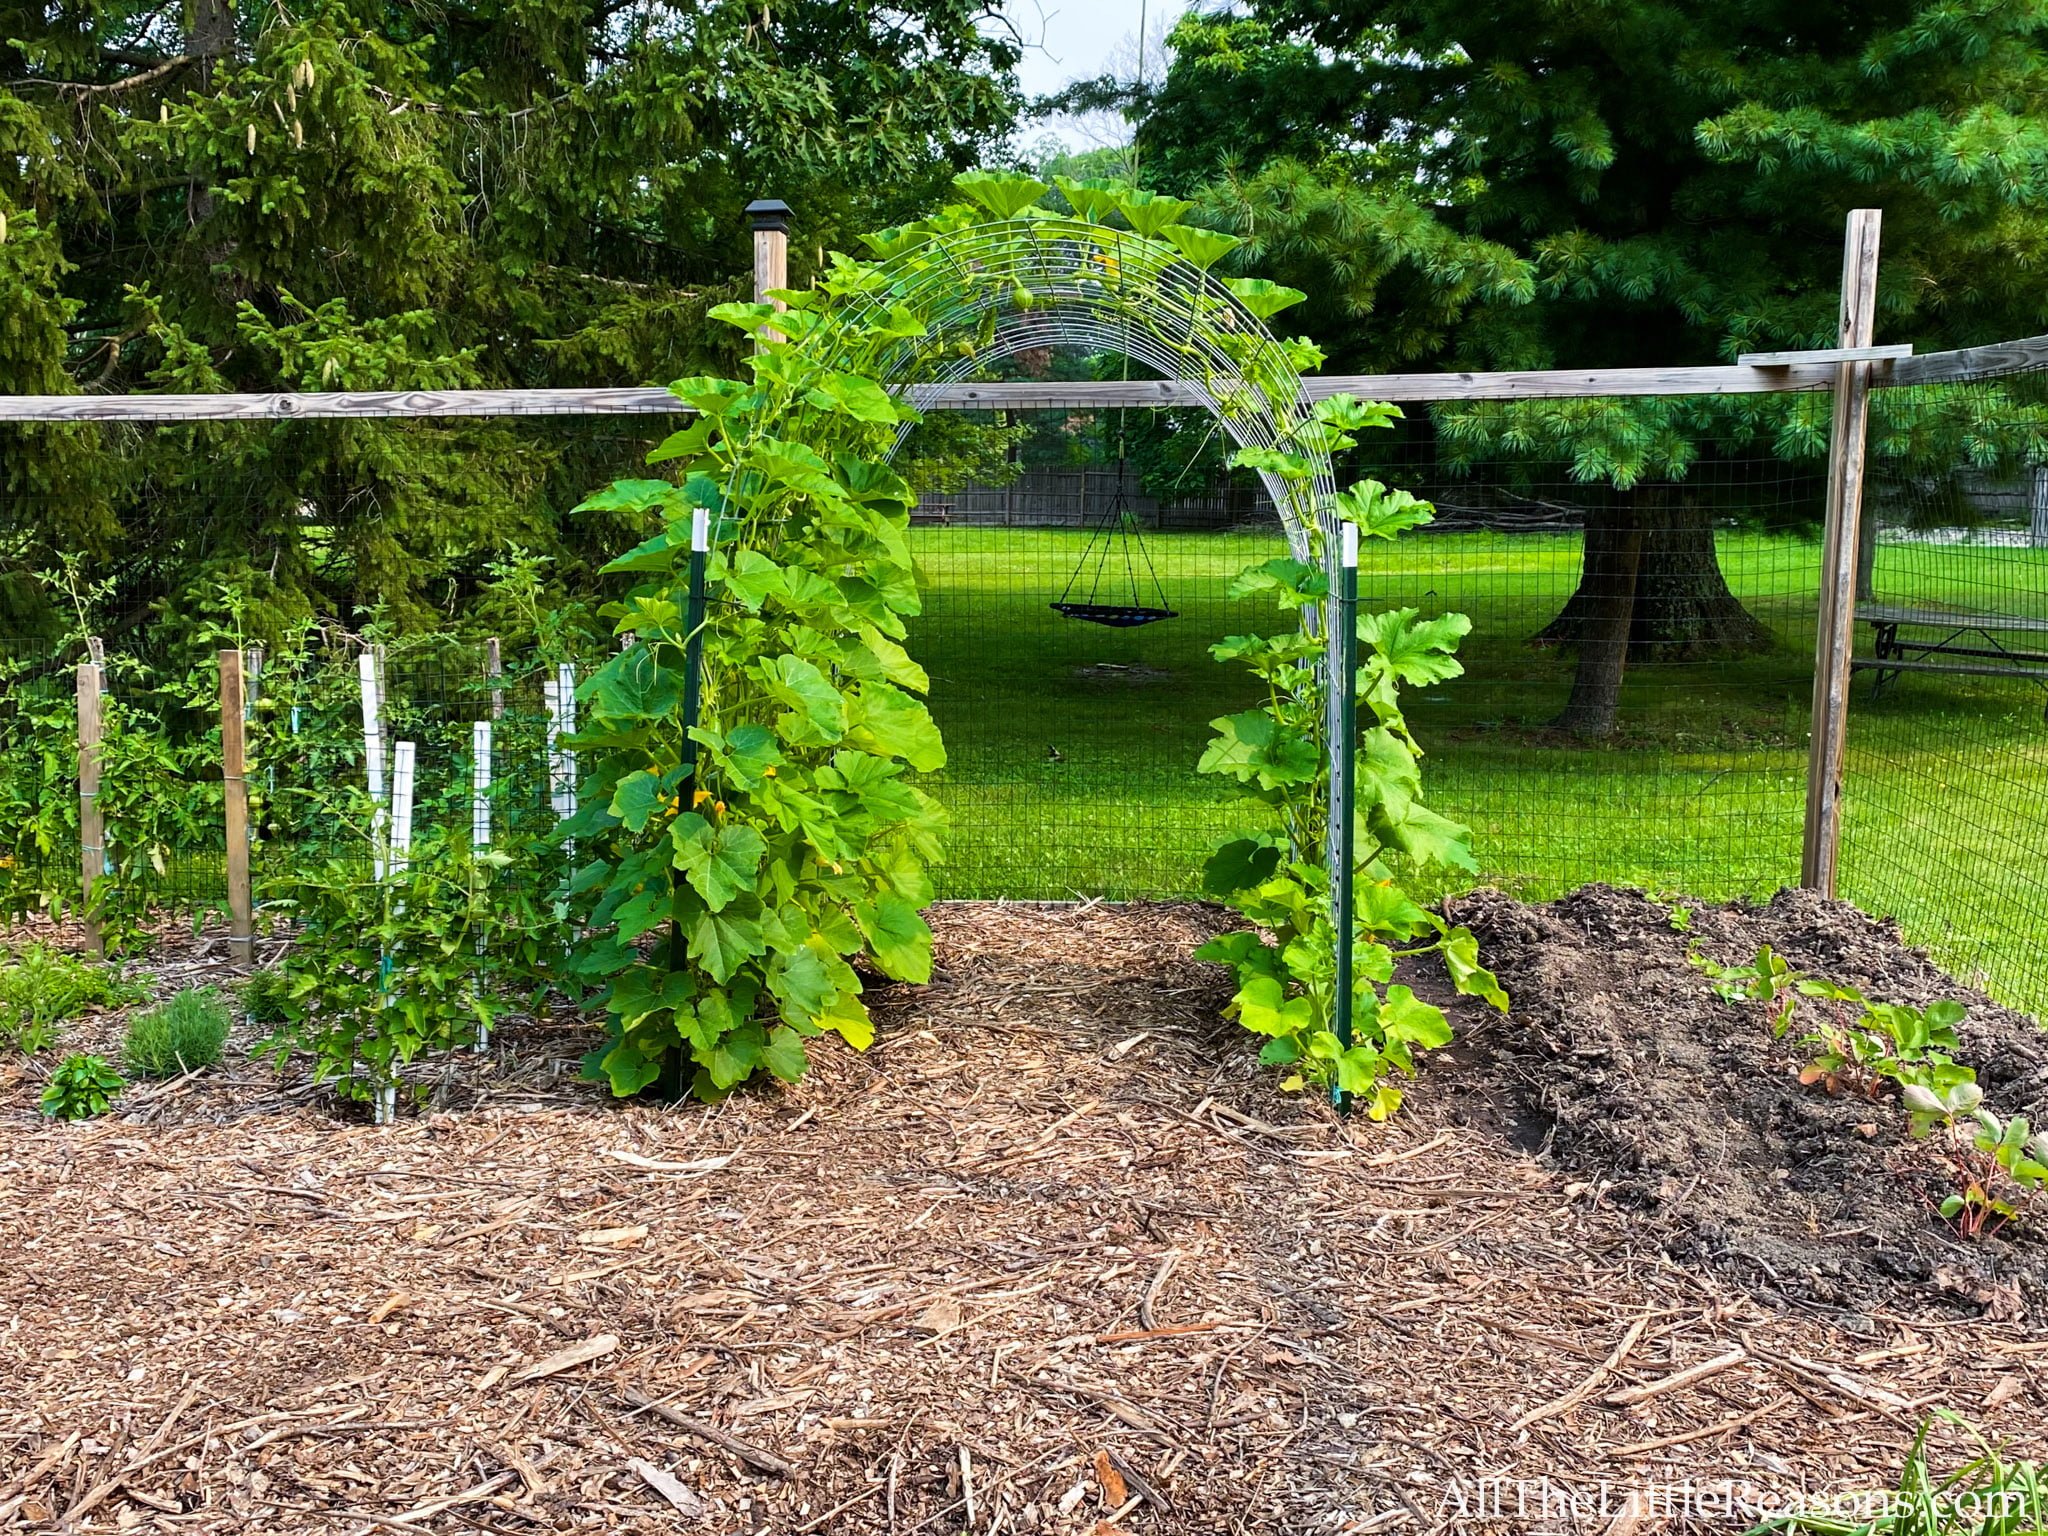
Creating Adequate Support for Climbing
Since you are growing butternut squash vertically, a sturdy support structure is essential. Install a trellis or other climbing apparatus that can bear the weight of the growing vines and fruits. The support structure should be at least six feet tall to accommodate the height of the plants.
Preparing the Soil
Prepare the soil by loosening it with a garden fork or tiller. Butternut squash plants prefer well-draining soil with a pH level between 6.0 and 7.0. Incorporate organic matter into the soil, such as compost or well-rotted manure, to improve fertility and moisture retention.
Providing Proper Drainage
Ensuring proper drainage is crucial for butternut squash plants. To prevent waterlogging, consider planting the squash in raised beds or mounds. If the soil in your garden tends to retain water, adding sand or compost to improve drainage can be beneficial.
Starting Butternut Squash Seeds Indoors
To get a head start on the growing season, it is recommended to start butternut squash seeds indoors. Follow these steps for successful seed starting:
Timing the Seed Starting
Start your butternut squash seeds indoors about four to six weeks before the last expected frost date in your area. This will give the seedlings enough time to grow and develop before being transplanted outdoors.
Using the Right Seed Starting Mix
Use a high-quality seed starting mix specifically formulated for starting seeds. This type of mix is lightweight and provides good drainage, which is crucial for healthy seedling growth. Fill seed trays or small pots with the seed starting mix.
Sowing the Seeds
Plant two to three seeds in each pot or cell, about half an inch deep. Water the soil lightly to ensure good seed-to-soil contact. Place the trays or pots in a warm location, around 70°F (21°C), to encourage germination.
Providing Optimal Germination Conditions
To promote germination, cover the trays or pots with plastic wrap or a humidity dome. This will help create a greenhouse-like environment and keep the soil moist. Check the soil regularly and water as needed to keep it consistently moist but not waterlogged.
Transplanting Seedlings to the Vertical Garden
Once the seedlings have developed a few sets of true leaves and all danger of frost has passed, they can be transplanted into the vertical garden. Follow these steps for successful transplanting:
Preparing the Seedlings for Transplanting
Before transplanting, harden off the seedlings by gradually exposing them to outdoor conditions. Start by placing them in a sheltered location for a few hours a day, gradually increasing their exposure over the course of a week. This will help the seedlings adjust to outdoor temperatures and prevent shock.
Choosing the Right Planting Technique
When transplanting the seedlings, make sure to plant them at the same depth they were growing in their pots, taking care not to bury the stem. Gently loosen the root ball and place the seedlings into the prepared holes in the vertical garden.
Spacing the Seedlings Appropriately
Space the seedlings approximately two to three feet apart to ensure adequate airflow and prevent overcrowding. Proper spacing allows the plants to receive optimal sunlight and reduces the risk of disease.

Training and Supporting the Growing Vines
One of the key aspects of growing butternut squash vertically is proper training and support for the growing vines. Here are some important steps to follow:
Installing a Trellis or Support Structure
Before the vines start to grow, install a trellis or other support structure that can bear the weight of the plants and fruits. Make sure the structure is securely anchored to prevent it from toppling over. The trellis should be tall and sturdy enough to accommodate the vertical growth of the vines.
Ensuring Proper Vine Attachment
As the vines begin to grow, gently guide them towards the trellis or support structure. Use soft ties or plant clips to secure the vines to the trellis without causing damage. Regularly inspect the attachment points to ensure they are secure and adjust as necessary.
Guiding the Vines Upward
Encourage the vines to grow vertically by gently training them to climb the trellis. As the vines reach the trellis, gently twine them around the support structure. This will help the vines grow upward and prevent them from sprawling along the ground.
Pruning the Vines
To maintain a manageable and productive plant, regular pruning is necessary. Remove any side shoots or suckers that emerge from the base of the plant or along the main stem. This will direct more energy into the growth of the main vine and promote better fruit development.
Caring for the Vertical Butternut Squash Plants
Proper care is essential for the health and productivity of your vertical butternut squash plants. Consider the following care practices:
Providing Adequate Watering
Butternut squash plants require consistent moisture, especially during fruit development. Water the plants deeply, providing enough moisture to penetrate the root zone. Avoid overwatering, as it can lead to root rot, but also prevent the soil from drying out completely.
Applying Mulch to Conserve Moisture
To conserve moisture, apply a layer of organic mulch around the base of the plants. Mulching helps retain soil moisture, prevent weed growth, and regulate soil temperature. Apply the mulch after the soil has warmed up and the seedlings are established.
Fertilizing the Plants
To promote healthy growth and development, feed your vertical butternut squash plants regularly. Apply a balanced fertilizer or compost tea every two to three weeks throughout the growing season. Follow the manufacturer’s instructions for proper application rates.
Managing Weeds and Pests
Regularly check the vertical garden for weeds and remove them promptly to prevent competition for nutrients and moisture. Additionally, be vigilant for common squash pests, such as aphids or squash bugs. Monitor the plants closely and take appropriate action, such as manual removal or using organic pest control methods, if necessary.

Harvesting Butternut Squash
Determining the right time to harvest butternut squash is crucial to ensure optimal flavor and storage life. Follow these guidelines for successful harvesting:
Determining the Right Time to Harvest
Harvest butternut squash when the fruits have reached their full size and the skin has hardened and turned a deep tan color. The rind should not be easily punctured with a fingernail. Avoid waiting too long to harvest, as overly mature squash may have a tough texture and reduced flavor.
Using Proper Harvesting Techniques
To harvest butternut squash, use a sharp knife or pruners to cut the fruit from the vine, leaving a small stem attached. Take care to avoid damaging the vine or nearby fruits during the harvesting process. Handle the squash gently to minimize bruising.
Curing and Storing the Squash
After harvesting, allow the butternut squash to cure in a warm, dry location for about one to two weeks. This process helps toughen the skin and increases the storage life of the squash. Once cured, store the squash in a cool, dry place with good ventilation. Properly cured and stored squash can last several months.
Saving Seeds for Future Planting
If you want to save seeds from your butternut squash for future planting, choose a mature, fully ripened fruit to collect the seeds from. Cut the squash open, remove the seeds, and rinse them thoroughly to remove any pulp or debris. Allow the seeds to dry completely before storing them in a cool, dry place.
Common Problems and Solutions
Growing butternut squash vertically comes with potential challenges. Here are some common problems and solutions:
Powdery Mildew
Powdery mildew can be a common issue with squash plants, particularly in humid climates. To prevent or control powdery mildew, ensure good air circulation around the plants by properly spacing them and pruning any overcrowded foliage. Applying organic fungicides or treatments like neem oil can also help prevent the disease.
Squash Vine Borers
Squash vine borers can cause severe damage to squash plants. To prevent them, cover the base of the plants with a floating row cover or aluminum foil at the time of planting to prevent the adult moths from laying eggs. Regularly inspect the plants for any signs of borer activity and remove and destroy any affected stems.
Blossom End Rot
Blossom end rot is a physiological disorder that causes sunken, dark spots on the blossom end of the fruit. It is often caused by calcium deficiency or inconsistent watering. Ensure that the plants receive adequate calcium through proper fertilization and maintain consistent soil moisture to avoid this problem.
Lack of Pollination
If squash plants produce female flowers but fail to set fruit, it may be due to a lack of pollination. Encourage pollination by attracting bees and other pollinators to your garden. Consider planting companion flowers that attract pollinators nearby or hand-pollinating the female flowers using a small brush or cotton swab.

Crop Rotation and Succession Planting
Implementing crop rotation and succession planting strategies is important for maintaining soil fertility and minimizing disease and pest problems. Follow these guidelines for successful crop rotation and succession planting:
Understanding the Importance of Crop Rotation
Crop rotation involves changing the location of crops from year to year to disrupt pest and disease cycles and improve soil health. Avoid planting butternut squash or any other members of the squash family in the same spot for consecutive years. Rotate with unrelated crops to prevent the buildup of pathogens or nutrient depletion.
Planning for Succession Planting
Succession planting allows for a continuous harvest throughout the growing season. Start by planting a batch of butternut squash seeds indoors. Once those plants are established in the vertical garden, start another batch of seeds indoors for a later planting. This way, you can stagger the harvest and enjoy fresh squash for an extended period.
Choosing Suitable Rotation Crops
When rotating crops, choose other plants that are not in the squash family. Good rotation crops for butternut squash include legumes, leafy greens, or root crops. These crops provide different nutritional needs and help break pest and disease cycles.
Avoiding Common Mistakes
When implementing crop rotation and succession planting, avoid common mistakes such as planting related crops too close together or failing to plan for adequate space and support for the vertical growth of the squash plants. Proper planning and organization will ensure a successful and productive garden.
Tips for Growing Butternut Squash Vertically
Here are some additional tips to help you successfully grow butternut squash vertically:
Start with Healthy and Vigorous Seedlings
Choose healthy seedlings with strong stems and vibrant leaves for transplanting. Avoid plants with signs of disease or pests. Healthy seedlings have a better chance of thriving and producing a bountiful harvest.
Regularly Monitor and Inspect the Plants
Keep a watchful eye on your butternut squash plants throughout the growing season. Regularly monitor for signs of pests, diseases, or nutrient deficiencies. Promptly address any issues that arise to prevent them from escalating and impacting the overall health of your plants.
Provide Proper Air Circulation
Ensuring good air circulation is important for preventing disease and promoting healthy growth. Properly space the plants and prune away any excessive foliage that may impede air movement. This will help minimize the risk of fungal diseases and keep the plants healthy.
Consider Companion Planting
Companion planting involves growing specific plants together to benefit each other. Consider planting companion plants such as marigolds or nasturtiums near your butternut squash. These plants can help repel pests and attract beneficial insects that can aid in pollination.
By following these comprehensive guidelines, you can successfully grow butternut squash vertically. Enjoy the delicious fruits of your labor and experiment with different varieties to find the perfect fit for your garden. Happy gardening!


