Have you ever wondered how to save seeds from butternut squash? Look no further! This comprehensive guide will walk you through the process step-by-step, ensuring that you can enjoy your favorite squash variety for years to come. From selecting the perfect squash for seed saving to properly drying and storing the seeds, we’ve got you covered. With our friendly tips and helpful advice, you’ll be well on your way to becoming a successful seed saver. Get ready to embark on a satisfying journey of preserving and growing your own butternut squash – let’s get started!

Choosing Butternut Squash for Seed Saving
When it comes to saving seeds from butternut squash, the first step is to select mature and disease-free squash. This is crucial because only healthy and fully matured squash will have viable seeds worth saving. Choose squash that has reached its full size and has a hard, tough skin. Inspect the squash carefully for any signs of disease or rot, as saving seeds from unhealthy squash can result in poor-quality seeds.
Saving seeds from heirloom varieties is highly recommended. Heirloom squash varieties are open-pollinated and have been passed down for generations. Unlike hybrid varieties, heirloom squash varieties have consistent traits and flavors. By saving seeds from heirloom varieties, you can preserve their unique characteristics and contribute to the preservation of these traditional varieties.
Consider cross-pollination when selecting squash for seed saving. Squash plants of the same species can cross-pollinate with each other, leading to hybridization. This means that if you grow different varieties of squash in close proximity, their seeds may not come true to type. If you want to maintain the purity of the squash variety you are saving seeds from, it is important to either isolate the plants or only grow a single variety in your garden.
Harvesting Butternut Squash for Seed Saving
To successfully save seeds from butternut squash, you need to harvest the squash at the right time and prepare them properly for seed extraction. Determining the maturity of the squash is essential for obtaining viable seeds. A fully mature butternut squash should have a deep tan or beige color and a hard, woody stem. Avoid harvesting squash that is still green or has a soft stem, as the seeds may not be fully developed.
Once you have identified mature squash, it is time to prepare them for seed extraction. Start by cleaning the squash, removing any dirt or debris. It is important to handle the squash with care to avoid damaging the seeds inside. Use a clean and sharp knife to cut the squash open and reveal the seeds. Take your time and be gentle during this process to preserve the seeds’ integrity.

Extracting Seeds from Butternut Squash
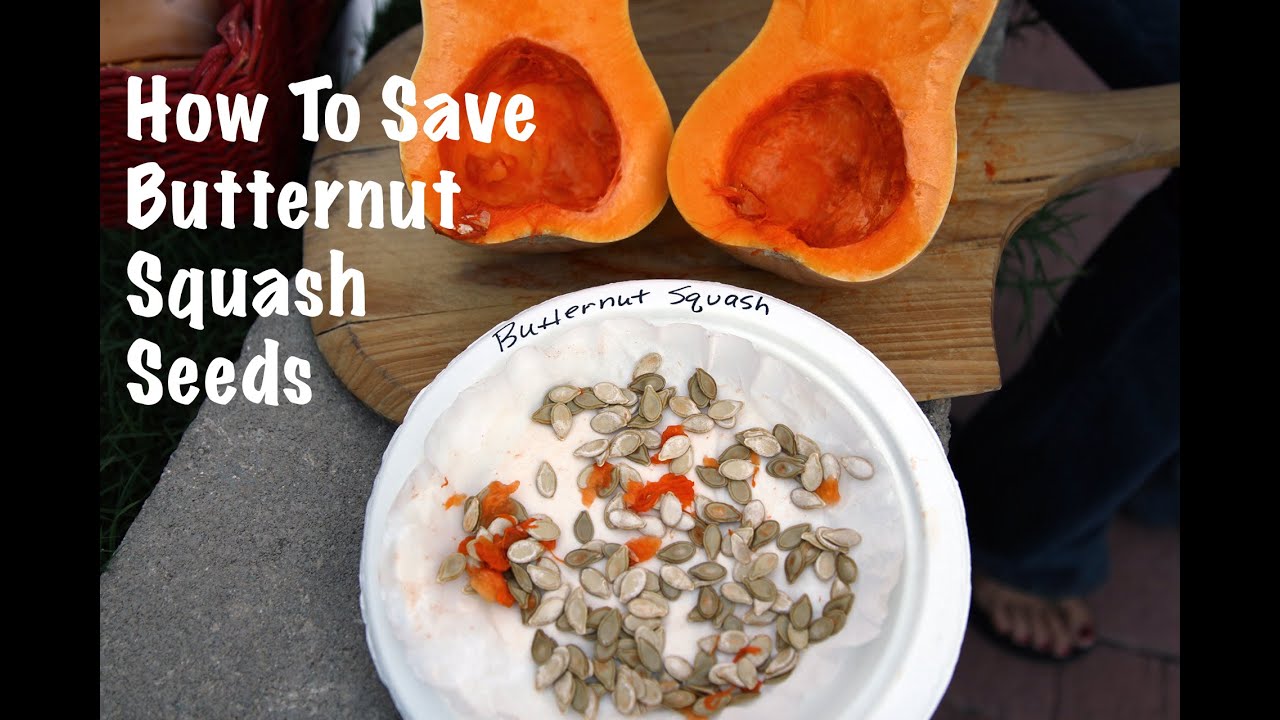
Cutting the squash is the first step in extracting the seeds. Slice the squash in half lengthwise, exposing the inner cavity filled with seeds. Use a spoon or your hands to scoop out the seeds and place them in a bowl. Be thorough and make sure to collect all the seeds from each squash.
Once you have collected the seeds, remove any additional pulp or flesh that may be attached. The seeds should be separated from the squash as much as possible. Rinse the seeds with water to further clean them and help remove any remaining pulp. Be gentle during this process to avoid damaging the seeds.
Cleaning and preparing the seeds is the final step in the extraction process. Spread the seeds out on a clean towel or paper towel and allow them to air dry for a few days. This will help remove any moisture and ensure the seeds are thoroughly dried. Make sure the seeds are fully dry before moving on to the next step.
Drying Butternut Squash Seeds
Choosing the right drying method is crucial to preserve the viability of the butternut squash seeds. Two popular methods for drying squash seeds are air drying and oven drying.
Air drying is the simplest method and requires minimal equipment. After cleaning and preparing the seeds, spread them out on a clean surface, such as a baking sheet or a tray. Place the seeds in a well-ventilated area away from direct sunlight. Stir or turn the seeds daily to ensure even drying. Depending on the humidity and temperature, the seeds may take several weeks to completely dry.
Oven drying is a faster method but requires more attention to prevent overheating and damaging the seeds. Preheat your oven to the lowest temperature setting, usually around 100°F (38°C). Spread the seeds on a baking sheet in a single layer, ensuring they are not touching each other. Place the baking sheet in the oven and leave the door slightly ajar to allow air circulation. Stir or turn the seeds every 30 minutes to ensure even drying. Keep a close eye on the seeds to prevent overheating. It usually takes a few hours for the seeds to dry completely using this method.

Storing Butternut Squash Seeds
Once the seeds are thoroughly dried, it is important to store them properly to maintain their viability for future use. Ensuring the seeds are completely dry is crucial to prevent mold or rot during storage. If there is any doubt about moisture content, continue drying the seeds until they are completely dry.
Select suitable containers for storing the butternut squash seeds. Choose containers that are airtight and moisture-proof to protect the seeds from any potential damage. Glass jars with tight-fitting lids or food-grade plastic containers are excellent choices. Avoid using bags or envelopes as they may allow moisture to seep in and compromise the quality of the seeds.
Proper labeling and documentation are essential for seed storage. Clearly label each container with the variety and date of harvest. It is also helpful to include any additional information that may be useful in the future, such as specific growing conditions or characteristics of the squash variety. This will ensure that you can easily identify and retrieve the seeds when needed.
For optimal storage conditions, keep the containers in a cool and dark location. A pantry or basement is usually a suitable option. Avoid storing the seeds in areas with fluctuating temperatures or high humidity, as these conditions can reduce the seeds’ viability over time. With proper storage, butternut squash seeds can remain viable for several years.
Testing Seed Viability
Before planting saved seeds, it is important to test their viability. Seed viability refers to the percentage of seeds that are still capable of germinating and growing into healthy plants. Conducting a seed viability test will help determine if the saved seeds are worth planting.
There are several methods to test seed viability. One common method is the germination test. Take a representative sample of the saved seeds and place them on a moist paper towel or in a seed tray filled with moist soil. Keep the paper towel or tray in a warm and well-lit location. After a week or so, check the seeds for germination. Count the number of seeds that have sprouted and calculate the percentage of germination. If the germination rate is high, the seeds are still viable and can be planted.

Understanding Seed Saving Techniques
Open-pollinated vs. hybrid seeds is an important distinction to understand when saving butternut squash seeds. Open-pollinated seeds are produced by plants that naturally receive pollen from the wind, insects, or other natural means. These seeds will grow plants that have the same characteristics as the parent plants. On the other hand, hybrid seeds are the result of crossing two different varieties to produce desirable traits. Saving seeds from hybrid plants may result in unpredictable offspring with a mix of traits from the parent plants.
Maintaining genetic purity is crucial when saving seeds, especially for heirloom varieties. To preserve the unique characteristics of the squash variety, it is important to prevent cross-pollination with other varieties. This can be achieved through various isolation techniques, such as planting different squash varieties at a sufficient distance from each other or using physical barriers like nets or bags to prevent unwanted pollen transfer.
Common Challenges in Seed Saving
Seed saving can come with its own set of challenges. Cross-pollination is one such challenge. When different squash varieties are grown near each other, the potential for cross-pollination increases. To avoid this, it is important to isolate different varieties to prevent them from pollinating each other. This will help maintain the purity of the saved seeds.
Seed-borne diseases can also pose a threat to the quality of saved seeds. Squash plants can be affected by various diseases, such as powdery mildew or bacterial wilt. When saving seeds, it is crucial to select disease-free squash and ensure thorough cleaning and drying of the seeds. Additionally, proper storage conditions can help minimize the risk of seed-borne diseases.
Pest infestations can also impact saved seeds. Squash bugs and vine borers are common pests that can affect squash plants and their seeds. Regular monitoring of the plants, physical removal of pests, and implementing organic pest control methods can help minimize the risk of pest damage to the seeds.

When to Start Seed Saving
Seed saving from butternut squash can be done towards the end of the growing season. Wait until the squash has fully matured on the vine before harvesting the seeds. This typically occurs when the skin turns tan or beige and the stem has become hard and woody. Harvesting the seeds later in the season ensures that they have had sufficient time to develop and mature.
Seed-saving for next year’s crop is a great way to ensure a continuous supply of your favorite butternut squash variety. By saving seeds from healthy and mature squash, you can grow the same variety in your garden year after year. It is important to save seeds from multiple plants to maintain genetic diversity and preserve the vigor of the variety.
Utilizing Saved Butternut Squash Seeds
The primary use of saved butternut squash seeds is to plant and grow new squash plants. When planting the saved seeds, follow the recommended planting instructions for your specific climate and growing conditions. Ensure the seeds are planted at the appropriate depth and spaced adequately to allow room for the plants to grow.
Saved seeds can also be shared and exchanged with other gardeners. Seed sharing is a wonderful way to promote biodiversity and preserve heirloom varieties. By sharing your saved seeds, you can contribute to the collective effort of preserving traditional squash varieties and ensuring their availability for future generations.
In conclusion, saving seeds from butternut squash is a rewarding and sustainable practice that allows you to preserve unique varieties and contribute to the diversity of plant species. By following the proper procedures for selecting, harvesting, extracting, drying, and storing the seeds, you can successfully save viable seeds for future planting. Remember to consider cross-pollination, maintain genetic purity, and address common challenges to maximize the success of your seed-saving endeavors. Happy seed saving!


