Imagine having the perfect garnish for your cocktails right in your own kitchen. With just a few simple steps, you can create the most mouthwatering Homemade Cocktail Cherries that will elevate your drinks to a whole new level of deliciousness. Say goodbye to artificial, store-bought cherries and hello to the vibrant, sweet, and tangy flavor of these homemade gems. Whether you’re hosting a party or simply enjoying a nightcap, these homemade cocktail cherries are sure to impress your guests and add that extra touch of indulgence to your favorite drinks. Get ready to tantalize your taste buds and embark on a journey into the world of irresistibly scrumptious cherries.

Ingredients
To make delicious homemade cocktail cherries, you will need the following ingredients:
Maraschino cherries
These cherries are the star of the show when it comes to cocktail cherries. Maraschino cherries have a bright red color and a sweet, slightly tart flavor that pairs perfectly with cocktails.
Granulated sugar
Sugar is essential for creating the brine that will help preserve and sweeten the cherries. Make sure to use granulated sugar for this recipe.
Water
Water is needed to create the brine and syrup for the cocktail cherries. It helps dissolve the sugar and infuse the cherries with flavor.
Lemon juice
Lemon juice adds a tangy and refreshing touch to the cocktail cherries. It not only enhances the flavor but also helps preserve them.
Almond extract
Almond extract adds a delightful nutty flavor to the cocktail cherries. It gives them a subtle and unique taste that pairs well with various cocktail recipes.
Vanilla extract
Vanilla extract is another flavoring agent that adds depth and richness to the homemade cocktail cherries. It complements the sweetness of the cherries and enhances their overall taste.
Preparation
Before diving into the brining process, there are a few preparation steps that need to be taken care of.
Draining and rinsing the cherries
Start by draining the maraschino cherries from their original syrup. Rinse them under cold water to remove any excess sugar or syrup. This step helps reduce the sweetness and ensures the cherries are ready to be infused with the homemade brine.
Creating the syrup
In a saucepan, combine granulated sugar, water, lemon juice, almond extract, and vanilla extract. Bring the mixture to a boil, stirring continuously until the sugar has completely dissolved. This syrup will serve as the base for the brine that will be poured over the cherries.
Adding flavorings
Once the syrup has cooled slightly, add in the maraschino cherries. Gently stir the cherries to ensure they are fully coated with the syrup and the flavors are evenly distributed. Allow the cherries to soak in the syrup for about 30 minutes to an hour. This step allows the cherries to absorb the delicious flavors before they are packed into jars.

Sterilizing the Jars
To ensure the safety and longevity of your homemade cocktail cherries, it’s crucial to properly sterilize the jars.
Choosing and preparing the jars
Select glass jars with airtight lids that are specifically designed for canning. Make sure the jars are free from any cracks or imperfections. Wash the jars and lids with hot soapy water, then rinse them thoroughly to remove any traces of soap.
Preparing a boiling water bath
Fill a large pot with water and bring it to a rolling boil. The pot should be deep enough to fully submerge the jars. This boiling water bath will be used to process and seal the jars later in the process.
Sterilizing the jars
Place the washed jars, without the lids, into the boiling water bath. Allow them to boil for approximately 10 minutes to sterilize them. Carefully remove the jars from the water using tongs and set them aside to cool slightly. Take caution as the jars will be hot.
Brining Process
Now that the preparation and sterilization steps are complete, it’s time to start the brining process for your homemade cocktail cherries.
Making the brine
In a saucepan, combine the remaining syrup from the cherry mixture with additional granulated sugar and water. Bring the mixture to a boil, stirring constantly to ensure the sugar is fully dissolved. This brine will serve as the preserving liquid for the cherries.
Packing the cherries in jars
Carefully transfer the cherries from the syrup mixture into the sterilized jars, ensuring they are evenly distributed. Leave about half an inch of headspace at the top of each jar to allow for expansion during processing.
Pouring the brine over the cherries
Gently pour the hot brine over the cherries, filling each jar to just below the rim. The cherries should be completely submerged in the brine to ensure proper preservation and flavor infusion.
Removing air bubbles
Using a non-metallic utensil, such as a plastic spatula or chopstick, gently remove any air bubbles trapped inside the jars. This step helps prevent spoilage and ensures the cherries are properly packed.
Sealing the jars
Wipe the rims of the jars clean with a clean, damp cloth to remove any brine or residue. Place the lids on the jars and tighten them securely. Make sure not to overtighten, as this can prevent proper sealing during processing.

Processing the Jars
Now that the jars are packed, it’s time to process them using a hot water bath to seal and preserve the homemade cocktail cherries.
Preparing a hot water bath
Fill a large pot with enough water to fully submerge the filled jars. Place a heat-resistant rack or towel at the bottom of the pot to prevent the jars from directly touching the heat source.
Processing the jars
Carefully place the filled and sealed jars into the pot of hot water. Make sure the jars are fully immersed in water, with at least an inch of water covering the lids. Bring the water to a gentle boil and process the jars for the recommended time according to your recipe. This processing time varies depending on the specific type of cherries and recipe being used.
Cooling and storing
After the recommended processing time has elapsed, turn off the heat and allow the jars to cool naturally in the water bath. Once cool, carefully remove the jars from the water using tongs and place them on a towel-lined countertop to finish cooling. Once completely cooled, check that the lids are sealed by pressing the center of each lid. If the lid does not move or make a popping sound, it is properly sealed. Store the jars in a cool, dark place until ready to use.
Variations
While the classic cocktail cherries are a crowd-pleaser, you can also experiment with different flavors and liquors to create unique variations.
Whiskey-infused cherries
For whiskey lovers, consider infusing your cherries with the rich and smoky flavors of whiskey. Simply add a splash of your favorite whiskey to the brine mixture before pouring it over the cherries.
Spiced cherry cocktail cherries
Add a touch of warmth and spice to your cocktail cherries by incorporating spices such as cinnamon sticks, whole cloves, or star anise into the brine mixture. These spices will infuse the cherries with a delightful aroma and flavor.
Bourbon cherry delights
Take your cocktail cherries to new heights by using bourbon as the liquor of choice for the brine mixture. The sweetness of bourbon pairs exceptionally well with the cherries, creating a heavenly combination.
Amaretto cherry bombs
If you’re a fan of amaretto liqueur, try infusing your cherries with its sweet, almond-like flavor. The amaretto will enhance the almond extract used in the brine, creating a double dose of nutty goodness.
Rum-soaked cherries
For a tropical twist, consider using rum to infuse your cocktail cherries. The rum adds a hint of sweetness and a touch of Caribbean flair to your homemade concoctions.

Uses for Homemade Cocktail Cherries
Now that you have a jar (or several jars) of homemade cocktail cherries, let’s explore the various ways you can enjoy them.
Classic cocktails
Homemade cocktail cherries are the perfect addition to classic cocktails such as Old Fashioned, Manhattan, or a simple Negroni. They add a touch of elegance, sweetness, and visual appeal to your favorite mixed drinks.
Mocktails and non-alcoholic beverages
Don’t let the absence of alcohol limit your enjoyment of homemade cocktail cherries. These versatile delights can be used to garnish mocktails, sodas, and other non-alcoholic beverages. Stir some into your favorite Shirley Temple or top off your sparkling water for a refreshing treat.
Desserts
Cocktail cherries aren’t just limited to drinks; they can also be incorporated into various desserts. Top off your sundaes, ice creams, cakes, or even pancakes with these delightful cherries for a burst of sweetness and a touch of sophistication.
Storing and Shelf Life
Knowing how to properly store your homemade cocktail cherries is crucial to ensuring their quality and prolonging their shelf life.
Refrigeration vs. Canning
If you’re planning to consume the cocktail cherries within a few weeks, storing them in the refrigerator is a suitable option. Simply keep the sealed jars in the fridge, and they will stay fresh for up to 4-6 weeks.
If you want to extend the shelf life of your cherries, canning is the way to go. Properly sterilized and sealed jars of cocktail cherries can last for up to a year when stored in a cool, dark place, away from direct sunlight and heat sources.
Shelf life of homemade cocktail cherries
When properly prepared and stored, homemade cocktail cherries can retain their quality and flavor for up to a year. However, it’s always best to check for any signs of spoilage, such as off odors, mold, or fermentation, before consuming them.

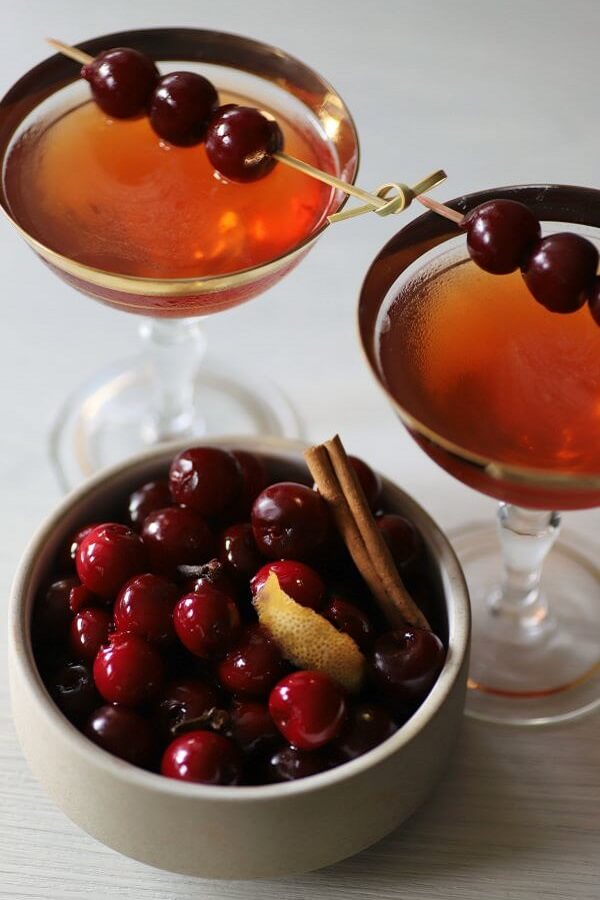
Presentation and Cocktail Garnish
Now that you have your homemade cocktail cherries ready, it’s time to elevate the presentation and make them the perfect garnish for your drinks.
Choosing the right cherry
When selecting cherries for garnishing cocktails, opt for plump, firm, and vibrant cherries. Choose cherries that are similar in size, ensuring a consistent appearance when used as a garnish.
Creative garnishing ideas
There are countless creative ways to use homemade cocktail cherries as a garnish. Skewer a few cherries onto toothpicks or cocktail picks and place them atop your cocktails for an elegant touch. You can also thread the cherries onto drink stirrers for a whimsical flair.
Serving suggestions
Beyond cocktail garnishes, consider incorporating the cherries as part of a charcuterie board or dessert platter. They can also be used to add a pop of color and flavor to fruit salads or as a topping for yogurt or oatmeal.
Final Tips
Here are some final tips and considerations to keep in mind when making and using homemade cocktail cherries.
Using organic cherries
Opt for organic cherries whenever possible to ensure the highest quality and reduce exposure to pesticides or other harmful chemicals. Organic cherries also tend to have a more robust and natural flavor.
Experimenting with spices and flavors
Feel free to get creative and experiment with different spices and flavors when making your homemade cocktail cherries. Consider adding a touch of ginger, cardamom, or even floral extracts like lavender or rose water for unique flavor combinations.
Labeling and dating the jars
To avoid confusion and ensure freshness, label each jar with the date of preparation and the type of cherries used. This will come in handy when organizing and using the cocktail cherries, especially if you have multiple variations or batches.
With these comprehensive steps and tips, you are well-equipped to create delicious homemade cocktail cherries that will elevate your favorite drinks and desserts. Cheers to your newfound mixology skills!