In this article, you will discover creative and practical solutions for dealing with mushy apples. Whether you have an abundance of overripe apples or simply want to salvage those that have seen better days, this comprehensive guide will provide you with easy, step-by-step techniques to transform your mushy apples into delicious treats. From making homemade applesauce to baking mouthwatering desserts, you will learn how to repurpose these soft and squishy fruits, ensuring that not a single apple goes to waste. Say goodbye to the disappointment of tossing out mushy apples and say hello to a world of culinary possibilities. Get ready to turn your mushy apples into something extraordinary!

1. Make Homemade Applesauce
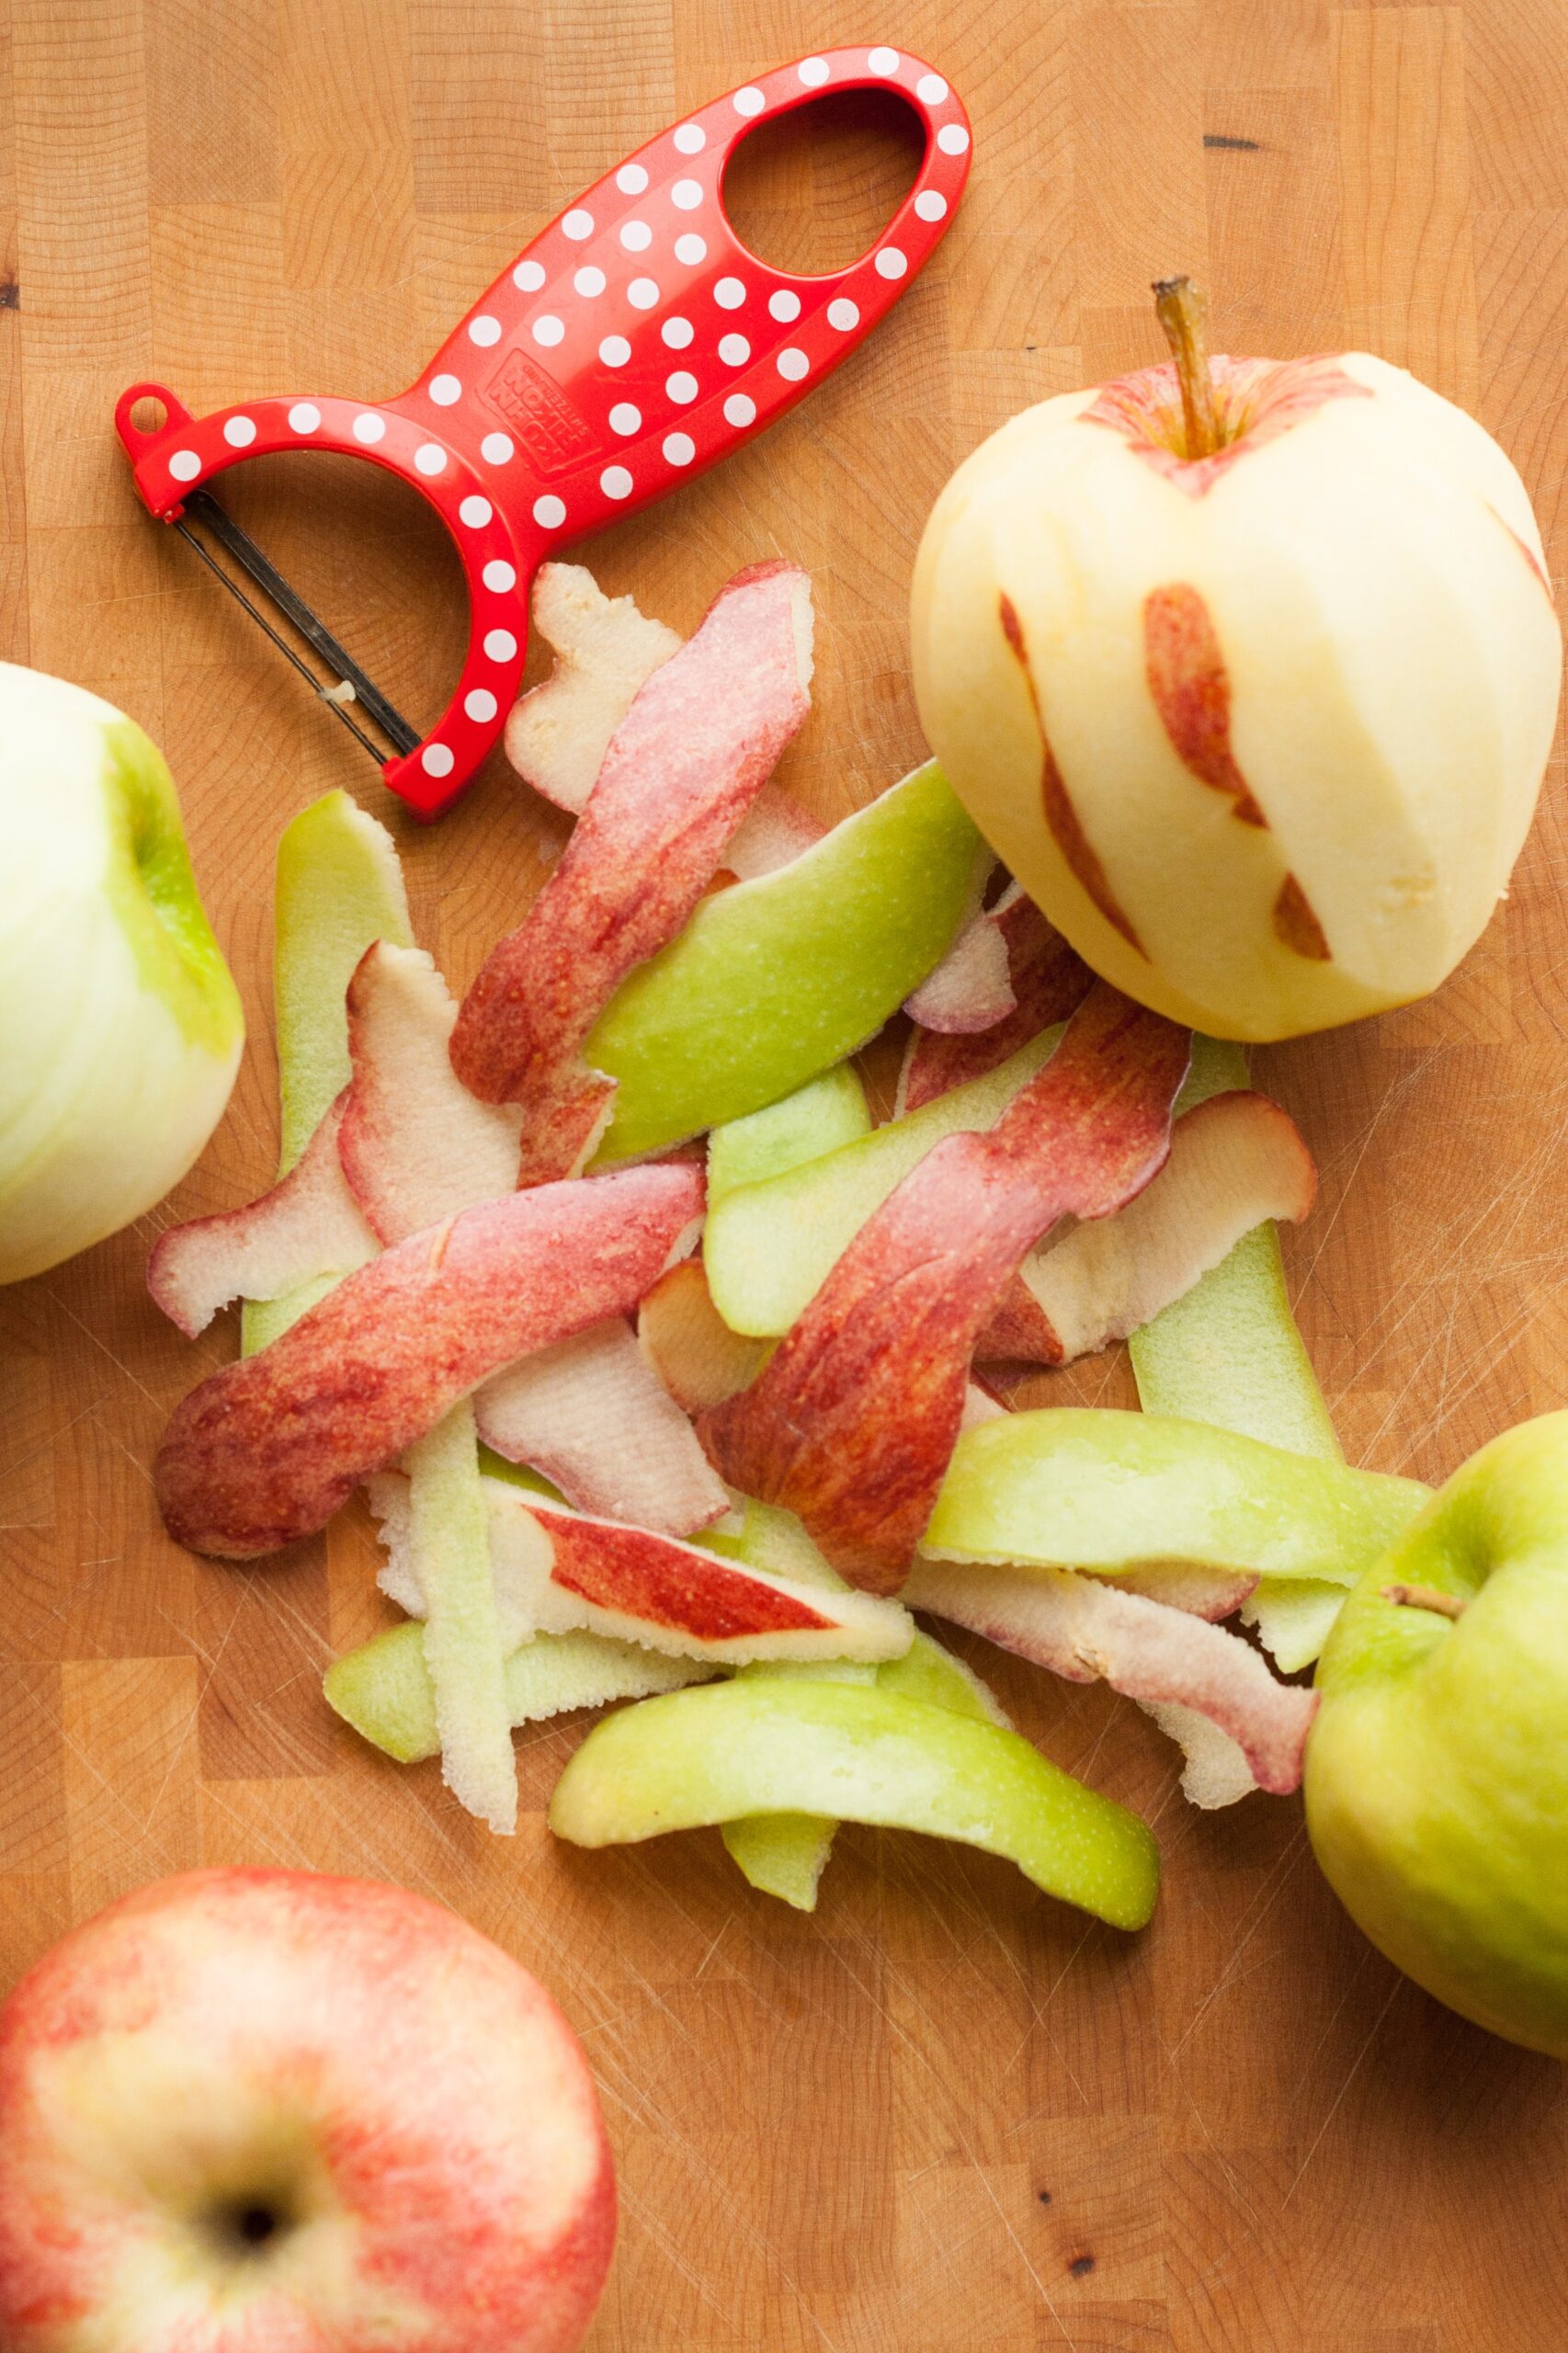
Peel and core the apples
To begin making homemade applesauce, start by peeling and coring the apples. This is an essential step to remove the apple skins and remove the core, as these parts can affect the texture and taste of the final applesauce. You can use a vegetable peeler to remove the skin or use a paring knife if you prefer. After peeling, cut the apples into manageable chunks.
Chop the apples into chunks
After peeling and coring the apples, it’s time to chop them into smaller chunks. The size of the chunks can vary depending on your preference for the texture of the applesauce. Some people prefer larger chunks for a chunkier texture, while others prefer smaller chunks for a smoother consistency. Ensure that all the chunks are roughly the same size to ensure even cooking.
Cook the apples
Once the apples are chopped, it’s time to cook them. You can choose to cook them on the stovetop or in a slow cooker. If using a stovetop, place the chopped apples in a saucepan and add a small amount of water to prevent sticking. Cover the pan and cook the apples over medium heat until they become soft and tender. If using a slow cooker, simply place the chopped apples in the slow cooker and cook on low heat for several hours until the apples are cooked through.
Blend or mash the cooked apples
Once the apples are thoroughly cooked and soft, you have the option to either blend or mash them to create the desired consistency of your applesauce. If you prefer a smooth texture, use a blender or food processor to puree the cooked apples until smooth. For a chunkier texture, use a potato masher or fork to mash the cooked apples until they reach your desired consistency.
Sweeten and season the applesauce
After blending or mashing the cooked apples, it’s time to sweeten and season the applesauce to enhance its flavor. You can add sweeteners such as sugar, honey, or maple syrup to taste. Additionally, you can add spices like cinnamon, nutmeg, or vanilla extract for a warm and aromatic flavor. Adjust the sweetness and seasonings according to your preference, tasting as you go.
Store or serve the applesauce
Once the applesauce is sweetened and seasoned to your liking, you can choose to either store it or serve it immediately. If you’re planning to store it, let the applesauce cool completely before transferring it to airtight containers. It can be stored in the refrigerator for about a week or frozen for longer-term storage. If serving immediately, consider serving the applesauce warm or chilled, depending on your preference.
2. Create Apple Butter
Prepare the apples
To begin making apple butter, start by preparing the apples. Similar to making applesauce, you’ll need to peel and core the apples. After peeling and coring, slice the apples into thin slices. The thin slices will help the apples cook more evenly and result in smoother apple butter.
Cook the apples
Once the apples are prepared, it’s time to cook them. You can cook the apples on the stovetop in a large saucepan or opt for using a slow cooker. Place the sliced apples in the chosen cooking vessel and add a small amount of water to prevent sticking. Cook the apples over low to medium heat until they become soft and tender. The cooking process may take several hours, especially if using a slow cooker.
Blend or puree the cooked apples
Once the apples are cooked and soft, it’s time to blend or puree them to create the desired texture for your apple butter. You can use a blender, food processor, or immersion blender to puree the cooked apples until smooth. This step will help remove any remaining chunks of apples and create a creamy and spreadable consistency.
Add sweeteners and spices
After blending the cooked apples, it’s time to add sweeteners and spices to enhance the flavor of the apple butter. Depending on your preference, you can add sugar, honey, or maple syrup to sweeten the apple butter. Additionally, spices like cinnamon, cloves, or allspice can be added to create a warm and flavorful profile. Adjust the sweetness and spices according to your taste preferences.
Simmer the mixture
Once the sweeteners and spices are added, it’s time to simmer the mixture to allow the flavors to meld and the apple butter to thicken. Place the blended apple mixture back on the stovetop or in the slow cooker and simmer over low heat, stirring occasionally. The simmering process will take several hours and will result in a richer and thicker apple butter consistency.
Store or enjoy the apple butter
After simmering the apple mixture to the desired consistency, it can be stored or enjoyed right away. If storing, let the apple butter cool completely before transferring it to sterilized jars or containers. It can be stored in the refrigerator for up to several weeks or canned for longer shelf life. Apple butter is incredibly versatile and can be enjoyed spread on toast, used as a topping for pancakes or waffles, or incorporated into various recipes.

3. Make Apple Jam or Jelly
Prepare the apples
To make apple jam or jelly, start by preparing the apples. Peel, core, and chop the apples into small pieces. Ensuring that the apples are consistently sized will help with even cooking and a more consistent texture in the final product.
Cook the apples with water
Once the apples are prepared, place them in a saucepan with a small amount of water. The water will help soften the apples and prevent them from burning. Cook the apples over medium heat until they become soft and mushy. Stir occasionally to ensure they cook evenly and don’t stick to the bottom of the pan.
Strain the cooked apples
After the apples have cooked and become soft, strain the cooked apples to remove any excess liquid. You can use a fine-mesh sieve or cheesecloth to strain the apples and separate the pulp from the liquid. Gently press the cooked apples to extract as much liquid as possible while retaining the pulp.
Add sugar and pectin
Once the cooked apples have been strained, transfer the pulp back to the saucepan. Add sugar to the pulp, adjusting the amount according to your desired level of sweetness. Additionally, if you prefer a firmer consistency, you can add pectin at this stage. Pectin is a natural thickening agent that helps jam or jelly set.
Boil the mixture
After adding sugar and optional pectin, bring the mixture to a boil over medium-high heat. Stir continuously to dissolve the sugar and distribute the pectin evenly. Boil the mixture for a few minutes to allow it to thicken. To test if the jam or jelly has reached the desired consistency, you can perform a “plate test” by spooning a small amount onto a cooled plate. If it sets and doesn’t immediately run, it is ready.
Can or refrigerate the jam or jelly
Once the jam or jelly has reached the desired consistency, it can be preserved by canning or refrigerating. If canning, transfer the hot jam or jelly into sterilized jars, leaving a small amount of headspace at the top. Seal the jars according to proper canning methods and process them in a boiling water bath. If refrigerating, let the jam or jelly cool completely before transferring it to clean, airtight containers. Refrigerated jam or jelly can typically be enjoyed for several weeks.
4. Bake Apple Crisp or Crumble
Prepare the apples
To bake an apple crisp or crumble, start by preparing the apples. Peel, core, and slice the apples into thin wedges or slices. Ensure that the apples are evenly sized to promote even cooking and a consistent texture in the final dessert.
Create the topping mixture
Next, create the topping mixture for the apple crisp or crumble. In a separate bowl, combine ingredients such as oats, flour, brown sugar, cinnamon, and butter. Use your hands or a fork to mix the ingredients together until they form a crumbly texture. Adjust the amount of each ingredient to achieve the desired sweetness and texture.
Combine the apples and topping
Once the apples are prepared, place them in a baking dish and sprinkle the topping mixture evenly over the apples. Gently press the topping down to ensure it adheres to the apples. This combination will create a delicious contrast of soft and tender apples with a crispy and flavorful topping.
Bake the apple crisp or crumble
After combining the apples and topping, it’s time to bake the apple crisp or crumble. Preheat the oven to the specified temperature in your recipe, typically around 350°F (175°C). Place the baking dish in the preheated oven and bake for about 30-40 minutes or until the apples are tender and the topping is golden brown and crispy. The baking time may vary, so keep an eye on the crisp or crumble to avoid overcooking.
Serve and enjoy
Once the apple crisp or crumble is baked to perfection, remove it from the oven and let it cool slightly before serving. You can enjoy it warm on its own or enhance the experience by serving it with a scoop of vanilla ice cream or a dollop of whipped cream. The combination of sweet and tart apples with a crunchy and buttery topping is sure to delight your taste buds.

5. Make Apple Pie Filling
Prepare the apples
To make homemade apple pie filling, start by preparing the apples. Peel, core, and slice the apples into thin, even pieces. Choose apples that are suitable for baking, such as Granny Smith, Honeycrisp, or Golden Delicious, as they hold up well during the cooking process.
Cook the apples with spices and sweeteners
Once the apples are prepared, place them in a saucepan with a mixture of spices and sweeteners. Common spices used in apple pie filling include cinnamon, nutmeg, and cloves. Sweeteners such as granulated sugar, brown sugar, or maple syrup can be added according to your desired level of sweetness.
Thicken the mixture
After adding the spices and sweeteners, cook the apple mixture over medium heat until the apples become tender and the mixture thickens. In some cases, you may need to add a thickening agent such as cornstarch or flour to help achieve the desired consistency. Be sure to follow the specific recipe instructions regarding the amount and method of adding the thickening agent.
Cool the pie filling
Once the apple mixture has thickened to the desired consistency, remove it from the heat and let it cool completely. The cooling process allows the flavors to meld together and the filling to set. Cooling the pie filling is essential before using it in a pie, as adding hot filling to a pie crust can result in a soggy bottom.
Use or freeze the apple pie filling
Once the apple pie filling has cooled, you can use it immediately in a pie or tartelette, or you can choose to freeze it for later use. If freezing, transfer the cooled filling to airtight containers or freezer bags, ensuring that you leave some headspace for expansion. Frozen apple pie filling can typically be stored for several months. When ready to use, thaw the filling in the refrigerator overnight before incorporating it into your chosen pie crust.
6. Whip Up Apple Pancakes or Waffles
Prepare the apples
To whip up apple pancakes or waffles, start by preparing the apples. Peel, core, and grate the apples using a box grater or a food processor with a grating attachment. The grated apples will add moisture, flavor, and texture to your pancakes or waffles.
Make the pancake or waffle batter
After preparing the apples, it’s time to make the pancake or waffle batter. In a mixing bowl, combine flour, baking powder, salt, sugar, and any additional spices such as cinnamon or nutmeg. In a separate bowl, whisk together the wet ingredients, including eggs, milk, melted butter or oil, and vanilla extract. Gradually incorporate the dry ingredients into the wet ingredients, mixing until just combined.
Add the apples to the batter
Once the pancake or waffle batter is mixed, fold in the grated apples. Ensure that the apples are evenly distributed throughout the batter for a consistent apple flavor in every bite. The grated apples will add moisture and natural sweetness to the batter.
Cook the pancakes or waffles
After incorporating the grated apples, it’s time to cook the pancakes or waffles. Heat a skillet or waffle iron over medium heat and lightly grease with butter or oil. For pancakes, pour the batter onto the skillet, using approximately 1/4 to 1/3 cup of batter for each pancake. Cook until bubbles form on the surface, then flip and cook until golden brown on both sides. For waffles, pour the batter onto the preheated waffle iron according to the manufacturer’s instructions. Cook until the waffles are crisp and golden brown.
Serve and enjoy with toppings
Once the pancakes or waffles are cooked to perfection, serve them immediately. You can enhance the apple flavor by topping your pancakes or waffles with additional grated apples, sliced fresh apples, or a drizzle of warm apple syrup. Traditional toppings such as butter, maple syrup, or whipped cream also pair well with apple pancakes or waffles.

7. Create Apple Muffins or Bread
Prepare the apples
To create delicious apple muffins or bread, start by preparing the apples. Peel, core, and chop the apples into small pieces. The size of the apple pieces can vary depending on your preference for texture. Smaller pieces will yield a more even distribution of apple throughout the muffins or bread.
Mix dry and wet ingredients
Next, in a large mixing bowl, combine the dry ingredients such as flour, baking powder, baking soda, salt, and spices such as cinnamon or nutmeg. In a separate bowl, whisk together the wet ingredients including eggs, sugar, oil or melted butter, milk, and vanilla extract. Gradually add the dry ingredients to the wet ingredients, mixing until just combined. Be careful not to overmix, as this can result in a tougher texture.
Add the apples to the batter
Once the batter is mixed, fold in the chopped apples. Gently incorporate the apples into the batter, ensuring they are evenly distributed. The apples will add moisture and a burst of flavor to the muffins or bread.
Bake the muffins or bread
After adding the apples to the batter, it’s time to bake the muffins or bread. Preheat the oven to the specified temperature in your recipe, typically around 350°F (175°C). Spoon the batter into lined muffin cups or greased loaf pans, filling them about two-thirds full. Bake for the specified amount of time, usually around 20-25 minutes for muffins and 50-60 minutes for bread, or until a toothpick inserted into the center comes out clean.
Cool and enjoy
Once the muffins or bread are baked to perfection, remove them from the oven and let them cool in the pans for a few minutes before transferring them to a wire rack to cool completely. This cooling process allows the muffins or bread to set and become easier to handle. Once cooled, you can enjoy the apple muffins or bread as is or enhance the flavor by spreading butter, cream cheese, or apple butter on top.
8. Make Apple Smoothies or Shakes
Prepare the apples
To make refreshing apple smoothies or shakes, start by preparing the apples. Peel, core, and chop the apples into small pieces. Removing the peel and core will ensure a smoother texture in the final smoothie or shake.
Blend the apples with other ingredients
Next, place the chopped apples into a blender or food processor. Add other desired ingredients such as yogurt, milk (dairy or plant-based), ice, and any additional flavors or sweeteners such as honey, cinnamon, or vanilla extract. The choice of ingredients can vary depending on your taste preferences and dietary restrictions, so feel free to experiment with different combinations.
Add sweeteners or flavorings
If you prefer a sweeter smoothie or shake, you can add sweeteners such as honey, agave syrup, or maple syrup. Alternatively, you can enhance the apple flavor by adding spices like cinnamon or nutmeg, or flavorings like almond extract or peanut butter. Adjust the amount of sweeteners or flavorings according to your taste preferences.
Blend until smooth
Once all the desired ingredients are added, secure the lid of the blender or food processor and blend until the mixture reaches a smooth and creamy consistency. Stop and scrape down the sides if needed, then continue blending until there are no visible chunks of apples or other ingredients.
Serve and enjoy
Once the smoothie or shake has reached the desired consistency, pour it into glasses and serve immediately. You can garnish your apple smoothie or shake with a sprinkle of cinnamon, a slice of fresh apple, or a dollop of whipped cream. These refreshing beverages are perfect for a quick breakfast, a post-workout snack, or a tasty treat any time of the day.

9. Cook Apple Chutney or Relish
Prepare the apples
To cook apple chutney or relish, start by preparing the apples. Peel, core, and chop the apples into small pieces. The size of the apple pieces can vary depending on your preference, but aim for consistent sizes to ensure even cooking.
Chop or dice the apples
Once the apples are prepared, continue by chopping or dicing them into smaller pieces. Chopped apples have a slightly larger size compared to diced apples. The choice of chopping or dicing will depend on your preference for texture in the final chutney or relish.
Cook the apples with vinegar and spices
After chopping or dicing the apples, place them in a saucepan along with vinegar and a variety of spices and seasonings. The type of vinegar used can vary, including apple cider vinegar, white vinegar, or balsamic vinegar, depending on your desired flavor profile. Common spices and seasonings for apple chutney or relish include ginger, garlic, onions, mustard seeds, cinnamon, cloves, and chili flakes. Cook the mixture over medium heat until the apples become tender and the flavors meld together.
Simmer the mixture
Once the apples have cooked with the vinegar and spices, reduce the heat to low and let the mixture simmer. Simmering allows the flavors to further develop and the chutney or relish to thicken. Stir the mixture occasionally to prevent sticking and ensure even cooking. The simmering process can take anywhere from 1 to 2 hours, but the time may vary depending on the specific recipe and desired consistency.
Jar and store the chutney or relish
After the chutney or relish has simmered to the desired consistency, let it cool slightly before transferring it to sterilized jars. Seal the jars tightly and store them in a cool, dark place. The chutney or relish can typically be stored for several months. Once opened, refrigerate any unused portion and consume within a few weeks. Apple chutney or relish is a versatile condiment that pairs well with savory dishes, cheese, or can be used as a delicious spread for sandwiches and wraps.
10. Make Apple Cider
Prepare the apples
To make apple cider, start by preparing the apples. Rinse the apples to remove any dirt or debris, and then roughly chop them into smaller pieces. The type of apples used can vary, but a mix of sweet and tart apples, such as Granny Smith and Honeycrisp, will produce a well-balanced flavor.
Juice the apples
Once the apples are prepared, place them in a juicer or blender to extract the juice. If using a juicer, follow the manufacturer’s instructions to juice the apples. If using a blender, blend the chopped apples until smooth, then strain the mixture through a fine-mesh sieve or cheesecloth to separate the juice from the pulp.
Heat and simmer the apple juice
After the apple juice is extracted, transfer it to a large pot or saucepan. Heat the juice over medium heat until it reaches a gentle simmer. It’s important not to boil the apple juice, as boiling can cause it to become cloudy. Simmering the juice allows the flavors to concentrate and enhances the natural sweetness.
Strain and sweeten the cider
Once the apple juice has simmered, remove it from the heat and strain it through a fine-mesh sieve or cheesecloth to remove any remaining pulp or solids. This step ensures a smooth and clear apple cider. At this stage, you can taste the cider and add sweeteners such as sugar, honey, or maple syrup according to your preference. Adjust the sweetness to achieve the desired level of sweetness.
Enjoy hot or cold
Once the apple cider is strained and sweetened, it can be enjoyed immediately. You can serve it hot by reheating it gently on the stovetop or in a slow cooker. Add warming spices such as cinnamon sticks, cloves, or star anise for an extra flavor boost. Alternatively, you can enjoy the apple cider chilled by refrigerating it until cold and serving it over ice. Apple cider is a comforting beverage that is perfect for cozy evenings, holiday gatherings, or whenever you’re in the mood for a refreshing drink.